部署说明
| 版本 | 时间 | 内容 | 贡献者 |
|---|---|---|---|
| 1.0 | 2019-6-24 | 初始版本 | ZhenlyChen |
应用部署架构
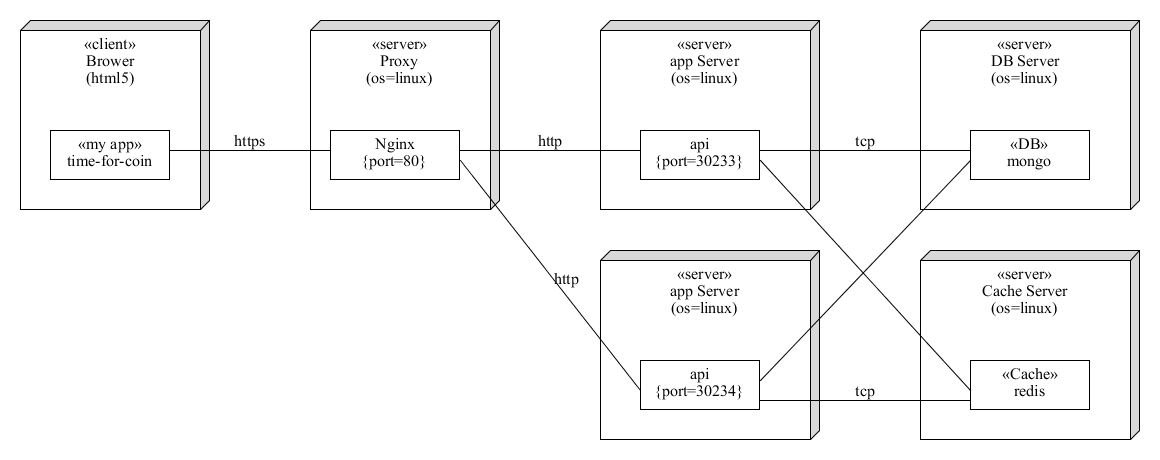
前端部署
生成静态文件
npm run build
复制到服务器指定目录
使用Nginx进行代理
server {
  listen 443 ssl http2;
  server_name coin.zhenly.cn;

  ssl on;
  # ...
  # SSL 配置

  add_header Strict-Transport-Security "max-age=63072000; includeSubdomains; preload" always;
  add_header X-Frame-Options SAMEORIGIN always;
  add_header X-XSS-Protection "1; mode=block" always;
  add_header X-Content-Type-Options nosniff;

  location / {
    root   /root/TimeForCoin/Web;
    index  index.html index.htm;
    try_files $uri $uri/ /index.html;
  }
}
小程序部署
使用微信web开发者工具打开工程目录,编译源码并上传,然后预览小程序或者在微信公众平台上发布应用
服务端部署
本地依赖服务
-
Nginx:反向代理
- MongoDB: 应用数据库
- Redis:缓存
外部服务
- COS:云对象存储
- Outlook Mail:邮件服务
- Violet:OAuth2 授权服务
- WeChat:微信授权服务
服务端配置
服务端需要填写服务的配置文件并且保存在服务端根目录下的config.yaml中
# 开发环境
dev: true

# HTTP 网络配置
http:
  host: 127.0.0.1
  port: 12345
  session:
    key: my-key
    expires: 30

# MongoDB 主数据库配置
db:
  host: 127.0.0.1
  port: 12346
  db: name
  user: user
  password: password

# Redis 缓存数据库配置
redis:
  host: 127.0.0.1
  port: 12347
  password: password
  db: 1
  session: 0

# Violet 授权系统配置
violet:
  id: id
  key: key
  host: https://xxx.com/api
  callback: http://xxx.com

# 微信小程序配置
wechat:
  id: id
  secret: secret

# 腾讯云对象存储 配置
cos:
  id: id
  secret: secret
  url: https://xxxx.myqcloud.com

# 邮件系统配置
email:
  host: smtp.office365.com
  port: 587
  user: example@example.com
  password: password
  from: xxxxx <example@example.com>
Nginx 配置
使用 Nginx 进行反向代理
server {
  listen 443 ssl http2;
  server_name coin.zhenly.cn;

  ssl on;
  # ...
  # SSL 配置

  add_header Strict-Transport-Security "max-age=63072000; includeSubdomains; preload" always;
  add_header X-Frame-Options SAMEORIGIN always;
  add_header X-XSS-Protection "1; mode=block" always;
  add_header X-Content-Type-Options nosniff;

  location /api/ {
    proxy_set_header X-Real-IP $remote_addr;
    proxy_set_header X-Forwarded-For $proxy_add_x_forwarded_for;
    proxy_set_header Host $http_host;
    proxy_set_header X-NginX-Proxy true;
    proxy_pass http://127.0.0.1:30233/;
    proxy_redirect off;
  }
 }
Docker-Compose.yml
部署MongoDB、Redis服务以及服务端服务
version: '3'
services:
  mongodb:
    image: mongodb:latest
    volumes:
      - /mnt/src/docker-containers/mongo-data:/mongodb
  redis:
    image: redis:4
    ports:
      - 6379:6379
    volumes:
      - "${REDIS_DIR}/conf:/usr/local/etc/redis"
      - "${REDIS_DIR}/data:/data"
    command:
      redis-server
  TimeForCoin:
    build:
      context: .
      dockerfile: Dockerfile
    image: time-for-coin
    network_mode: host
DockerFile
通过DockerFile对服务端程序进行构建和部署
FROM golang:1.12 as build

ENV GOPROXY https://go.likeli.top
ENV GO111MODULE on

WORKDIR /go/cache

ADD go.mod .
ADD go.sum .
RUN go mod download

WORKDIR /go/release

ADD . .

RUN GOOS=linux CGO_ENABLED=0 go build -ldflags="-s -w" -installsuffix cgo -o main main.go

FROM scratch as prod

COPY --from=build /usr/share/zoneinfo/Asia/Shanghai /etc/localtime
COPY --from=build /etc/ssl/certs/ca-certificates.crt /etc/ssl/certs/ca-certificates.crt
COPY --from=build /go/release/main /
COPY --from=build /go/release/config.yaml /

CMD ["/main"]
开发环境部署
本应用通过 travis-ci 实现从 提交 - 测试 - 部署 的自动部署方案
.travis.yml
language: go
go:
- 1.12.x
addons:
  ssh_known_hosts:
    - love.zhenly.cn
before_install:
- openssl aes-256-cbc -K $encrypted_da5ea0339585_key -iv $encrypted_da5ea0339585_iv
  -in deploy.enc -out ~/.ssh/deploy -d
- chmod 600 ~/.ssh/deploy
- cp ssh_config ~/.ssh/config
script:
- go build
- go test -v -coverprofile="coverage.txt" -covermode=atomic ./app/models/...
after_success:
- bash <(curl -s https://codecov.io/bash)
- ssh deploy@love.zhenly.cn "cd ~/TimeForCoin/Server && source ~/.bashrc && bash ./deploy.sh"
测试过程主要测试程序的构建以及单元测试,并且把测试结果发送到codecov上
对SSH密钥文件进行加密,并且把私钥保存在Travis-Ci上的环境变量,通过travis脚本对密钥文件进行解密,访问云服务器,执行保存在云服务器上的部署脚本即可实现部署。
deploy.sh
git checkout .
git clean -df
git pull
sudo docker-compose build
sudo docker-compose down
sudo docker-compose up -d
负载均衡
根据应用的部署架构,我们可以通过扩充系统的任意一部分获得更高的性能。
- 部署Redis集群
- 部署MongoDB集群
- 部署HTTP服务集群,使用Nginx实现负载均衡
- 使用CDN加速静态文件
直接使用
本项目在Release提供Windows以及linux可执行文件,可以通过直接使用可执行文件进行部署
.
├── Server
│   ├── Server.exe
│   └── config.yaml
└── Web
    ├── ProxyServer.exe
    ├── config.yaml
    └── public
        ├── css
        │   ├── ...
        │   └── xx.1bbf20be.css
        ├── favicon.ico
        ├── img
        │   └── ...
        ├── index.html
        └── js
            ├── ...
            └── xx.bda1ced7.js
修改Server和Web下的配置文件config.yaml后执行相应的可执行文件即可运行。
也可以使用-c指定配置文件路径
PS:小程序端的可执行文件不提供